The Incident reporting feature in Turnpoint Care allows providers to capture new incidents, escalate their status internally, collect data about them in multiple steps, submit them for resolution and mark them as “resolved”.
Once enabled, providers are able to select “Incident Administrators” who will be notified of new incidents & status updates of existing incidents.
|
Step 1 |
Step 2 |
Step 3 |
Step 4 |
Step 5 |
|
Adding the Incident – can be done by care worker or admin user |
In Review – Case Manager takes ownership of the incident |
Data Collection by Case Manager |
Submitting for Resolution |
Marking as “Resolved” |
Step 1 – Adding the Incident
Care worker or admin user can add an incident via their phone / PC
|
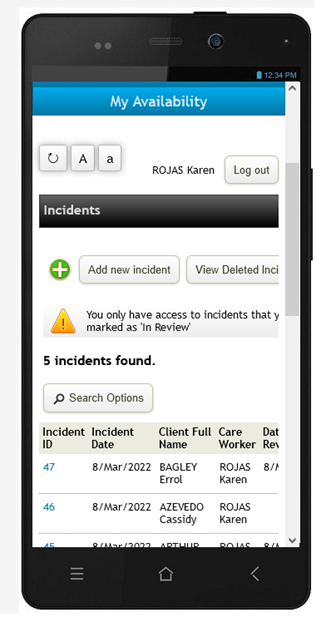
Select Incidents Click “Add new Incident”
Note - Incidents Tab will show all incident added by the worker.
|
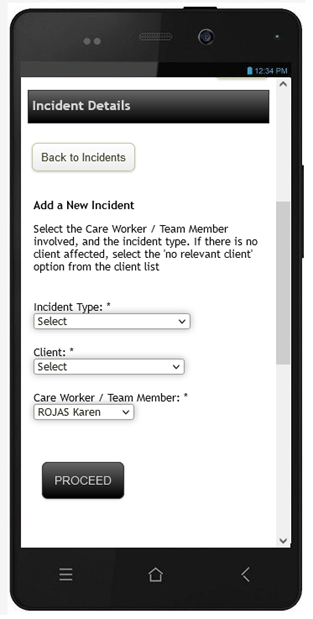
Select the type, client (if applicable) and care worker involved in the incident, then click PROCEED |
Complete the form – only Incident date & time are mandatory fields. Some fields will be ‘read only’ which are left for management to fill in |
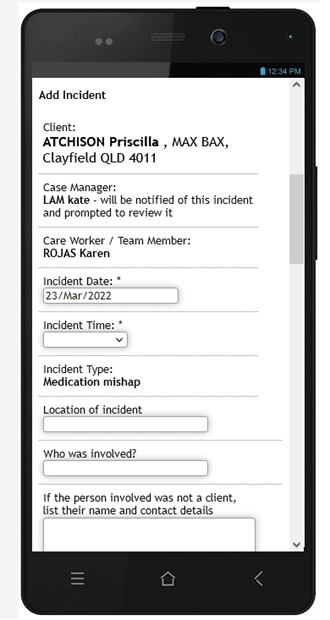
Once an incident is added, the case manager and nominated Incident Administrators will be notified via email.
New Incidents are marked as status “Added”, and can then only be viewed, edited by a worker until a case manager / admin user mark them as “In Review”.
All actions are tracked by the system and are listed at the bottom of each incident.
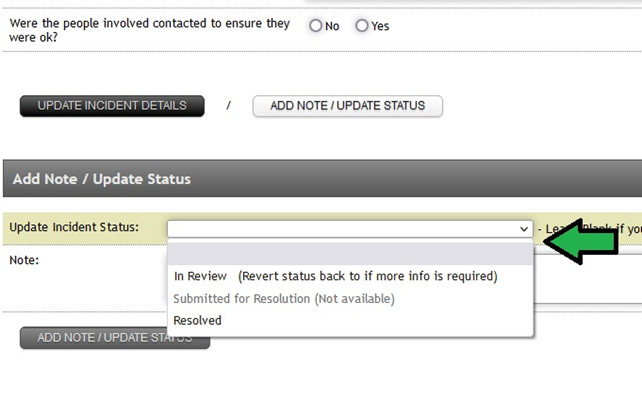
Step 2 – Marking as “In Review”
The case manager or admin user should now take ownership of the incident by clicking “ADD NOTE / UPDATE STATUS” and updating the incident status to “In Review”
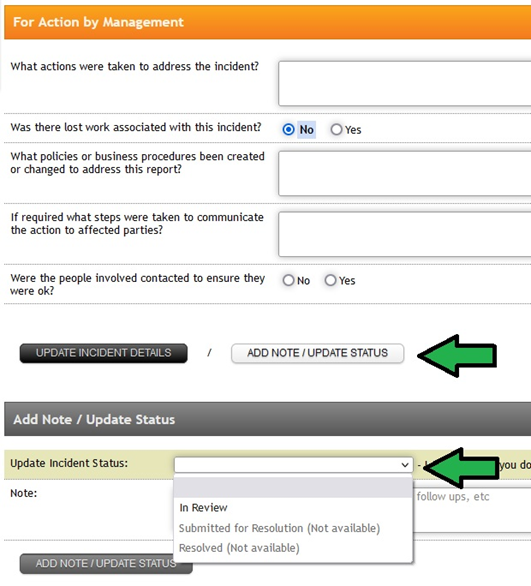
All status changes will alert the incident admin users and relevant case manager for the client via email.
Step 3 – Adding Details
While in review the case manager / admin user should add as much details as needed to the incident to ensure internal company policies are met. They can UPDATE the policies with these new incidents as much as needed, and they should also add notes about steps taken to attain the data required.

Step 4 – Submit for Resolution
Once all relevant data has been supplied by the case manager / admin user, they can mark the incident status as “Submitted for Resolution”.
Once this status is applied, it is set to “read only” and the case manager cannot make further adjustments to the incident. Only incident admin users will have the ability to edit from this put.

Step 5 – Mark as “Resolved”
Once the incident is marked as “Submitted for Resolution” the Incident administrators should now review all the data supplied.
If the data submitted is sufficient to internal requirements, the incident can be marked as “Resolved”, however if further information or detail is required the incident can be set back to “In Review” for the Case Manager to add further information to the incident.
Comments
0 comments
Please sign in to leave a comment.